Beginner Photography Gear Guide: Start Shooting Like a Pro with Just Your iPhone
Beginner Photography Gear Guide: What You Really Need (Even If You Just Use an iPhone)
If you're new to photography, it's easy to think you need expensive gear to take great photos. The truth is, you can start learning with something already in your pocket—your iPhone. Whether you're shooting portraits, products, or just capturing moments for fun, the principles of photography are the same. You can start small, learn the foundations, and grow into more advanced equipment as your skills improve.
This guide is your no-jargon, easy-to-follow roadmap for photography for beginners. We’ll cover what gear you actually need, how to take beautiful photos with an iPhone, and how to master essentials like composition, lighting, and the rule of thirds. Let’s jump in.
Start with What You Have: Your iPhone Is a Camera
Don't underestimate your iPhone. It may not be a DSLR, but it's more powerful than most beginner cameras from just a few years ago. What’s more, it’s intuitive, lightweight, and has built-in tools that can teach you the core skills every photographer needs.
Use the Grid to Understand the Rule of Thirds

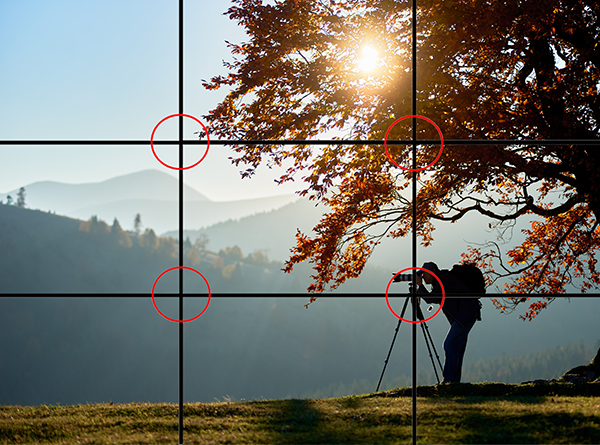
Turn on the grid in your iPhone camera settings. Go to Settings > Camera > Grid, and switch it on. You’ll see two vertical and two horizontal lines divide the screen into nine equal parts. This is called the rule of thirds—a basic photography composition technique that helps you frame more dynamic, balanced images.
Instead of placing your subject in the dead center, try placing them along the lines or where the lines intersect. For example, when taking a portrait, line up the person’s eyes along the top third line. It adds visual interest and makes your image feel more intentional.
Learn to Lock Exposure: Control the Light

Photography is all about light. Even with a phone, you have some control over how your camera reads and uses that light.
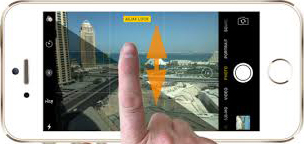
When using your iPhone camera, tap and hold on your subject. You’ll see a small sun icon appear next to a yellow box—this locks your focus and exposure. You can then slide your finger up or down to make the image brighter or darker.
Why does this matter? Auto-exposure can blow out highlights or make photos too dark. Locking in the exposure gives you control over how your image looks. If you're shooting a person with bright light behind them, you can expose for their face so they don't end up in silhouette.
Portrait Mode + Bokeh = Depth
One of the coolest features on modern iPhones is Portrait Mode. When you enable it, the camera simulates bokeh—that creamy, blurred background you see in professional photos. Bokeh helps isolate your subject and adds a beautiful sense of depth.
Try this: take a portrait with a busy background, then take the same shot in Portrait Mode. Notice how much cleaner and more focused your subject looks. It’s a small trick that instantly gives your photos a pro vibe.
Pro tip: the closer you are to your subject, and the farther they are from the background, the better the bokeh effect will look.
Master the Basics of Composition: Frame with Intention

Great photography isn’t just about gear—it’s about how you see. Start paying attention to composition—how elements are arranged in the frame.
Here are a few beginner-friendly composition tips:
Leading lines: Use natural lines (like roads, fences, shadows) to guide the viewer's eye toward your subject.
Framing: Use windows, arches, or doorways to frame your subject. This adds depth and focuses attention.
Negative space: Don’t be afraid to leave empty areas in your shot. It gives breathing room and can make your subject stand out even more.
Using your iPhone to practice these is great because you get instant feedback. Try taking the same photo multiple ways and see what composition feels best.
Understand Light: Natural and Budget-Friendly Lighting
If there’s one skill every beginner should focus on, it’s learning how light works. Good light can turn a mediocre photo into something magical.
Use Natural Light First
The best light for beginners? The sun. Here’s how to work with it:
Golden hour: Shoot right after sunrise or just before sunset for soft, warm light.
Window light: Indoors, stand next to a window with indirect light. It creates beautiful shadows and highlights.
Avoid overhead midday sun: It’s harsh and can create unflattering shadows, especially for portraits.
Move your subject around. Watch how light changes their face or the mood of the photo. This simple act builds your understanding of how to shape and use light.
Budget Lighting Gear for Beginners
Ready to experiment beyond daylight? Here are some affordable lighting tools:
Ring lights: Great for even lighting on faces. Perfect for portraits and content creation.
LED light panels: Small, adjustable, and portable. You can play with shadows and highlights.
Reflectors: Even a white poster board works! Reflect light back onto your subject to fill in shadows.
Use these tools to learn light direction, intensity, and color temperature—skills that will serve you well when you eventually upgrade to a DSLR or mirrorless camera.
What About Cameras and Lenses?
Eventually, you might want more control than your phone allows. But by the time you’re ready, you’ll understand framing, light, and storytelling—so you won’t just be buying gear, you’ll be investing in your vision.
Here’s a smart path forward:
Start with your iPhone to build foundational skills.
Learn what you love shooting—portraits, products, landscapes, etc.
Upgrade to an entry-level camera when you’re ready to go deeper.
You don’t need a huge camera bag on day one. You need curiosity, creativity, and a willingness to practice.
Ready to Take the Next Step?
Whether you're snapping portraits in Portrait Mode or mastering natural light by your window, the skills you're building right now are real photography skills. Starting small is smart. Starting now is smarter.
If you're looking to take your skills to the next level—or want a professional eye to help you with headshots, branding, or portfolio photography—I’d love to connect with you.
📸 Lon Wilkinson Photography is here to help you grow from wherever you are. Whether you're just learning how to use your iPhone camera or thinking about getting your first DSLR, I'm happy to offer tips, mentoring, and of course, world-class photography services.
Let’s create something beautiful together.
👉 Visit my website to learn more or get in touch.


